


Please note that I am using facebook only now. I am no longer posting to my blog at this time. Thank you for your continued support. If you would like to follow me on facebook please click on my facebook button here in my blog and send me a friend request. I would still love to see what your crafting.
It seems that there is just not enough time in the day to take pictures, write a post and upload to this site right now. I will however take a quick pic and post it on my facebook page of what I am working on when I get a chance to be crafty.
Also with all the security breaches going on right now I felt it best to condense some of my online accounts to a more manageable size.
Hope you are all having a wonderful crafty day.
Thank you for your support.
Scrappin Rabbit...
Friday, April 11, 2014
Sunday, January 19, 2014
A little Valentine
Hello my bloggie friends. It's been a long time since I've been on my blog to post some of my crafts. So I though I would share this Valentine that I made for my daughter.
I was looking through one of my Stampin' Up catalogs and came across a cute stamp that I don't have so I created my own using my computer and a word document.
Loved the card in the catalog so I re-created it to make it my own. I used a chipboard frame from my CTMH pack and rubbed my stamp pad on it to make it blue. I used my hearts embossing folder for the background and stamped the heart from Stampin' Up! using white ink and embossed it with white embossing powder. I popped the heart using foam tape. I hand drew my little hearts inside the letter "O" in the words love.
What do you think? Sorry for the blurry pic I just couldn't get a good pic with my iphone.
Hope you enjoy the rest of your Sunday.
Tuesday, January 7, 2014
Brrrr
Hello my crafty friends. I'm sitting here in my living room drinking hot chocolate and trying to stay warm. It's 2014 and time to get back in to my craft room and get busy crafting.
I have a project that I really need to work on and that is my Grandmother's cookbook/diary's from 1950 to 1988. She wrote about our entire family from when we were born and through out our adult lives. Every illness and every death to every meal that we shared from Thanksgiving, Christmas, Easter, Halloween, and all the birthdays in between.
They have all been passed down to me and it is my job to preserve them for our family. So I am slowly typing up her recipes and journal entries. Then I am printing them out and placing them on scrapbook pages. My twist. Of course the original journals need to be scanned to preserve her writing and the news paper clippings, etc. but I just cannot seem to let them go to a stranger to scan for me.
Hope you are all staying warm. I'll be posting a crafty project soon.
Happy scrapping!
Friday, August 23, 2013
Cut It Up Challenge #26 - Back to School Altered Notebook
Well summer flew by didn't it! Here we are with another Cut It Up Challenge to bring in the new school year. Challenge #26 - Back to school - altered notebook.
This was a fun challenge and also a little sad for me since this is my last post as a design team member for Cut It Up! I had a blast and it has been wonderful to be a part of such a great team.
I chose to alter three mini notebooks. My daughter gives out little incentive prizes for different stages of learning so I decided to add to her prize bucket with these. She wanted me to stick to the subjects as my theme so this is what I came up with.

Carts used:
Create A Critter
Going Places
Life's a Party
Glitter stick on letters from my stash
Stamp set used for the books under the worm
Ribbon from my stash
All paper from my scrap bin
from my DT sisters and to join in on the fun.
Can't wait to see what you come up with. :)
Friday, August 9, 2013
Cut it Up Challenge #25 - What's Bugging You?
Happy Friday my little hopper's.
It's time for another Cut It Up Challenge. Challenge #25 - What's Bugging You? Today we were asked to make a project using a bug. Well how fun is that? I think it's super duper fun!
Since my nephew's B-day is right around the corner; well October, but to me it's right around the corner since it seems that this year has been flying by, I made him a B-day card for this buggy challenge.
I decided to use Flick as my bug. Remember him from a Bug's Life? I cut him out right away and laid him down on my table so I could decide just what I wanted to do with him. I searched though my stamps and came across the "bring on the cake" sentiment and knew exactly what I wanted to do by looking at Flick with his hands on his hips.
Here's what I came up with:

Isn't he cute? I thought it would be fun to make it look like he climbed up the cake and got rid of the candles so he could just eat the cake without all the Birthday fuss. :)
Here's how I did it:
Cricut Carts:
Best of Pixar - Flick cut at 4"
Birthday Bash - Cake cut twice at 3 3/4"
Candle cut at 1 1/2"
Cardstock:
Recollections - I used up some of my scrap recollections paper for all die cut images.
Card size: 5 1/2 x 4 1/4
Mat size: 5 1/4 x 4 both outside and inside matts
Gelly Roll pen in white - used to color Swiss Dots on top cake.
Zig Pen in Black - used to doodle on Flick and the tag.
Cuttlebug Folder in Swiss dots - used to emboss layers on top cake.
Foam tape - used to pop the top cake and hand made tag
Recollections Ink - Blk
Studio g stamp - Bring on the Cake and Happy Birthday on inside of card.
Thanks for stopping by. To see more buggie projects and to play along with us stop by the Cut It Up Blog.
Friday, July 26, 2013
Cut it Up Challenge # 24 - Celebrate Summer!
Thanks for hopping by, it's time for another Cut it Up Challenge. Challenge #24 - Celebrate Summer by making a summer themed project using one of the super cute digi's from The Paper Nest.
What a fun project this was. I rarely use digi's so this was a great way to get me out of my comfort zone and remind me how fun and versatile digi's can be.
The Paper Nest has super cute digi stamps so I encourage all my little hopper's to hop on by and check them out.
I made this fun card using the Strawberry Emma digi. Isn't she cute? When I think of summer I think of picnics and all the yummy fresh fruit that you can eat. I think Emma agrees.
I kept with the black and white theme and just used one extra color for my card to really make the berries pop.

What I used:
I used my Spellbinder Standard Circles and Lacey Circles to mat Emma. I cut a 4 x 5.25 mat on black Recollections CS and used my Swiss Dots Cuttlebug folder to add a little more interest. I added my ribbon to that mat then I glued it down to my card base. I used some foam tape to pop Emma up and used some Christmas Red Stickles to color the berries and Emma's hair bow. Emma was printed on Recollections white CS from my computer. I forgot to get a picture of the inside of the card. I printed out my own sentiment that says, "Have a berry nice day!" Love the punny sentiments. :)
Hop on over to Cut It Up to see more great summer themed projects from my DT sisters.
We would love for you to join in on the fun.
Monday, July 22, 2013
Craftin Desert Diva's Linky Party - Child's Birthday - Animal Theme
I am so excited to be a guest designer for Craft It Up & Link It Up Linky Party hosted by Tara of Craftin Desert Divas! Every other Monday marks the beginning of a new semi-weekly linky party and you could win fabulous prizes by playing along!!
This linky party theme is a Child's Birthday using an animal. The sponsors are:
The more you link up, the better your chances to win one of the awesome prizes listed above. Visit Craftin Desert Divas for all the rules and to play along.
For my project today, I made a party favor. Cute and simple. This idea came from the paper creations magazine summer issue. I loved this idea and had to try it out for myself. It's super easy to make so you could make several of these in no time.


This linky party theme is a Child's Birthday using an animal. The sponsors are:
KaDoodle Bug Designs - $15 giftcard
Robin's Nest - $10 giftcard
CardzTV- Stamp set of choice
The more you link up, the better your chances to win one of the awesome prizes listed above. Visit Craftin Desert Divas for all the rules and to play along.
For my project today, I made a party favor. Cute and simple. This idea came from the paper creations magazine summer issue. I loved this idea and had to try it out for myself. It's super easy to make so you could make several of these in no time.
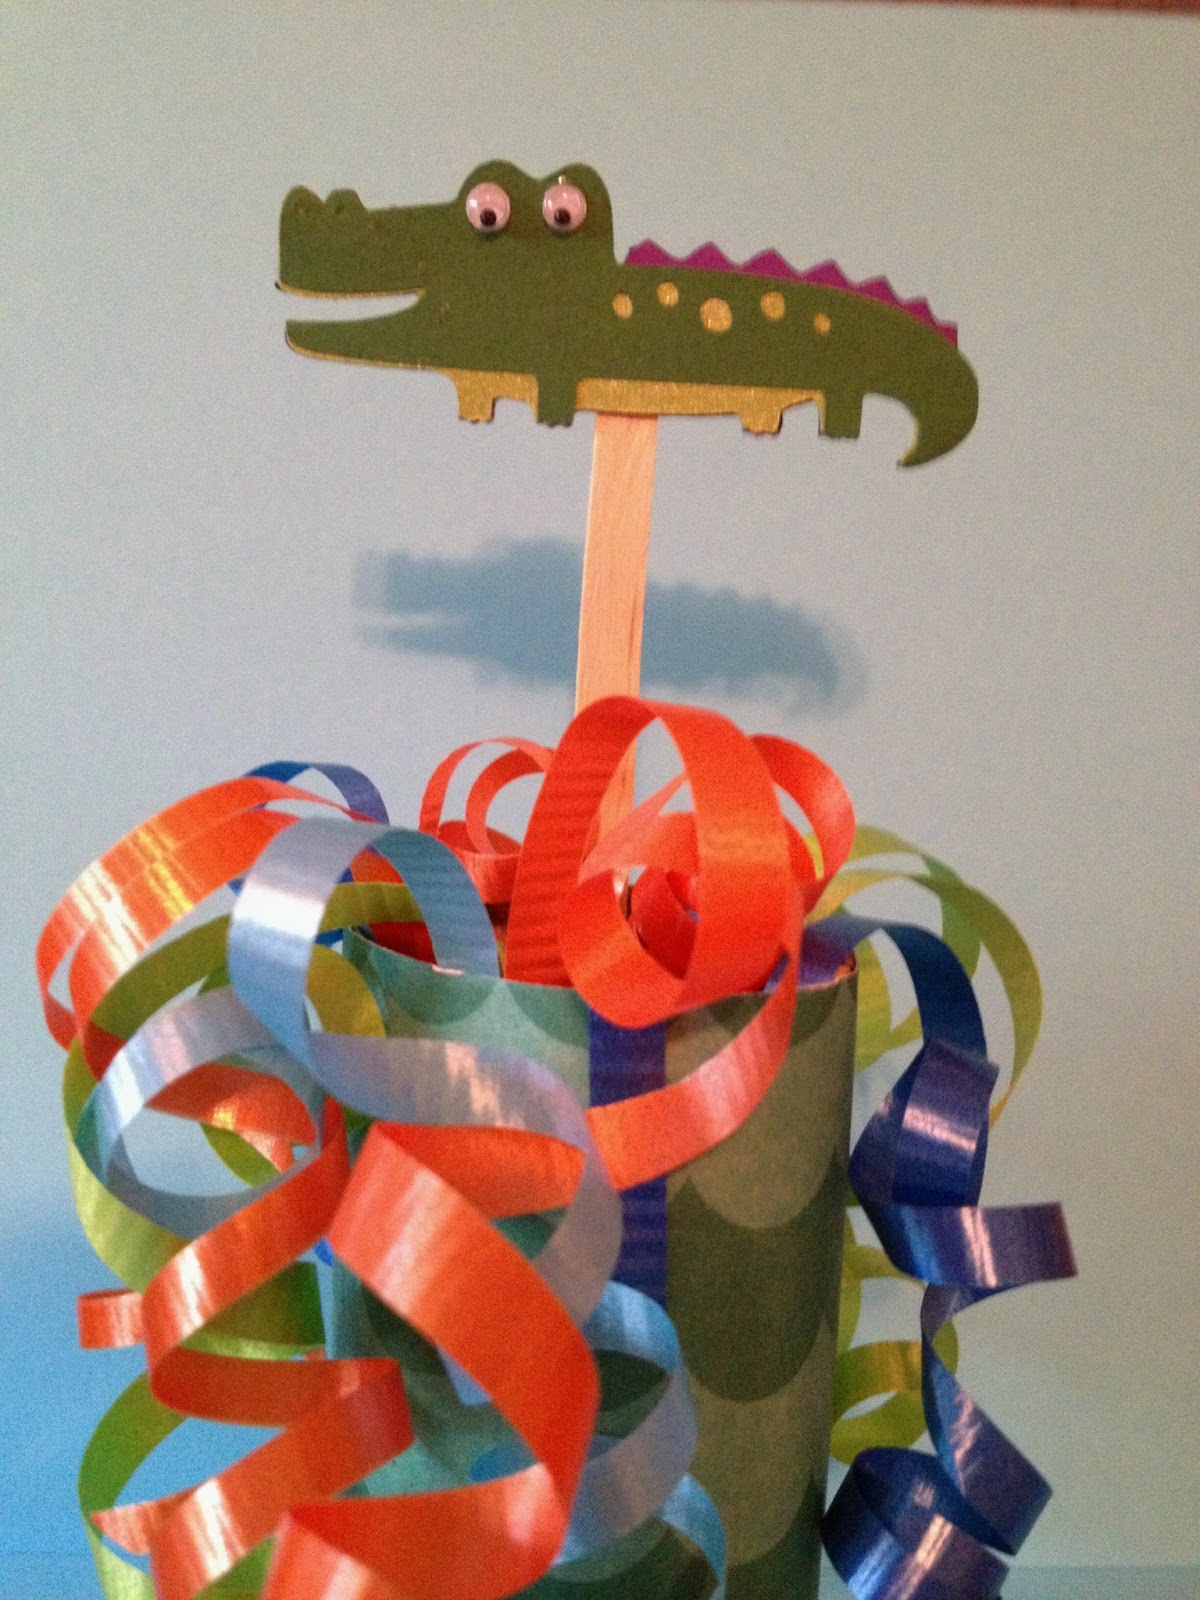

Here's what I used:
Create A Critter cart - pg. 45 Gator cut @ 1" assembled and glued to coffee stir stick
Paper towel roll cut down to 4"
Spellbinder Standard circles die to use as end cap for the party favor. trace around your tube then make tick marks with your scissors up to your traced circle. Bend this petals up and glue to your tube for your end cap.
Jaded blossoms - small treat bag
Curly ribbon and card stock to decorate roll - colors of your choice. Cut CS to fit roll and attach. Cut curly ribbon long enough to tie around treat bag and flow out top of roll. Make sure you fill the tube with your favorite candy, toys, etc. then curl ends of ribbon and place treat bag inside of open end of roll.
Swedish Fish candy - I thought it would cute and it goes with my gator theme. :)
Thanks for stopping by.
Can't wait to see your projects.
Friday, July 12, 2013
Cut It Up Challenge #23 - Christmas in July
It's time for another Cut it up Blog Challenge and this one was right up my alley. It's Challenge #23 - Christmas in July.
My Little Hopper's know that I have been making Christmas cards early this year so that I can have the time to sit back and enjoy the Holiday with out stressing myself out. So what a nice surprise to see that I got to create another Christmas card to add to my collection.
Believe it or not I actually struggled with this one since I am not in the Christmas mood right now. It's summer and I just celebrated the Fourth. My daughter gave me the idea to incorporate Uncle Sam's hat in my design. Such a clever and crafty girl, she takes after her Mom, hehehe.
Here is what I came up with to include her idea. How fun is this?

Here's how I did it:
Create A Critter 2 cart - pg 51 icon, Uncle Sam's hat cut at 2" on my scrap pieces of Recollections CS.
Jolly Holidays cart - Santa 1 cut at 4" again using my scrap Recollections CS.
My background mat was cut from Stars and Stripes from the Paper Studio at 5 1/4 X 4. Same for the inside mat but I stuck with white CS for that.
The Santa was originally holding a bag but I covered it up with Uncle Sam's hat, then cut off the part of the bag that sticky out from the side of the hat. Santa also came with a weird a little piece that was supposed to be his face but it looked out of place to me so I opted for some google eyes instead. For his beard and trim I used pearlescent CS from Color Bok. I used my D'Vine Swirls cuttlebug folder to give his beard some curls.
It's very hard to see by I also took my Sizzix folder in Powered sugar to emboss a little design on Santa's belt. I kept one star from the band around Uncle Sam's hat to stick in Santa's beard. then I used foam tape on him and the hat to pop it off the card.
For the hat I used a little two-sided sticky tape and cut that of my stars off of a decoration that I purchased from Michael's and attached that to the back of the hat.
I used my Studio g stamp to create my sentiment and made my own tag for my card.
Thanks for stopping by today.
To see more Christmas in July Projects and to play along with us,
stop by the Cut it Blog.
Friday, June 28, 2013
Cut It Up Challenge #22 - Make a project to celebrate Canada Day or Independence Day
Glad you stopped by, I have another project to share for the Cut it up Blog Challenge.
Cut it up Challenge #22: Make a project to celebrate either Canada Day or Independence Day sponsored by 3 Girl Jam.
Well since I live in the Good ol' US of A my project is to celebrate Independence Day.
I've been in to home decor projects lately so I decided to try my hand at making a flower wreath. I'm very happy with the way this turned out. I bought my wreath base from the dollar store. I love a good bargain.

Here's how I did it:
I used my Art Philosophy cart and cut out several flowers at 2" then pieced two of them together and fluffed them up. I used a little bling from my stash and adhered that with a glue dot to the centers.
I hot glued each flower to the wreath base. Then I dug through my ribbon draw and came across a red, white and blue hair tie that I found at Target last year so I cut it apart and used the ribbon for the bottom part of my wreath.
Here's a close up of the flowers. From the book, the flowers kind of looked like stars to me so I thought they would make a great Fourth of July wreath.

Thanks for stopping by today to check out my project.
To play along this week and to check out more great projects from my DT sisters
stop by the Cut It Up! Blog.
Friday, June 14, 2013
Cut it Up Challenge # 21 - Red, White and Blue and Trendy Twine
Welcome my bloggie friends, I have another project to share for the Cut it up Blog Challenge.
Cut it up Challenge #21 - Create a project using the colors red, white, and blue and trendy twine from Annie's Paper Boutique.
This was a fun challenge since we got to play with this yummy twine. I decided for this challenge that I wanted to make something that I have not made yet so I choose this home décor project.
I started out with my Artiste cart and cut the cone on page 42 at 5" from The Paper Studio 8.5x11 crackled star CS. I used my Sookwang two sided sticky tape to hold this together.
To decorate I used Trendy Twine in Berries Jubilee for the handle. I added a flower and button from my stash and added some more Trendy Twine In the Navy for the center of the button. Just so I could try out every color from this collection I used more Trendy Twine in Cranberry for the fringe at the bottom of my cone.


Hop on over to the Cut It Up Blog to see more inspiring projects today from the Cut it Up DT and to play along.
Cut it up Challenge #21 - Create a project using the colors red, white, and blue and trendy twine from Annie's Paper Boutique.
This was a fun challenge since we got to play with this yummy twine. I decided for this challenge that I wanted to make something that I have not made yet so I choose this home décor project.
I started out with my Artiste cart and cut the cone on page 42 at 5" from The Paper Studio 8.5x11 crackled star CS. I used my Sookwang two sided sticky tape to hold this together.
To decorate I used Trendy Twine in Berries Jubilee for the handle. I added a flower and button from my stash and added some more Trendy Twine In the Navy for the center of the button. Just so I could try out every color from this collection I used more Trendy Twine in Cranberry for the fringe at the bottom of my cone.

To finish off the cone I added some flowers and a few patriotic finds to the inside of the cone.

My daughter has already claimed this one so I'll have to make one for myself now. :)
Thanks for stopping by.
Playing along at:
Craftin Desert Divas - Red, White, and blue Linky Party
Friday, May 31, 2013
Cut it Up Challenge # 20 - Father's Day
Happy Friday friends, I have another project to share for the Cut it up blog Challenge.
Cut it up Challenge #20 - Create a project to celebrate Father's Day.
This was a fun challenge because this year, I decided to make something for the hubby since he is such a great Dad to the kids. He love candy so I thought it would be fun to make him a Father's Day candy dish.
What do think?


To decorate this dish:
I got this glass container from our local Old Time Pottery store.
I used the Billionaire lite cricut cart to cut the tie @ 5" on to Recollections Card Stock in white and then black.
I had the black and white ribbon in my stash to I used that as the collar and just hot glued that to the dish. Then I hot glued the tie down.
For the black circle I used Accent Essentials cart and the cut it at 2 1/4" and for the white circle I used my EK Success circle punch in 1 3/4".
I used my studio g stamp set for the "Happy Father's Day" and recollections pigment ink in blk.
That's it! Easy Peasy!
Hop on by the Cut It Up Blog to see more inspiring projects today from the Cut it Up DT and to play along.
Thanks for stopping by.
Monday, May 27, 2013
A few more wedding things...
Happy Monday and Memorial Day! Hope everyone is having a wonderful day with family and friends.
I have a few more wedding things to share with you.
I had to make a layout for my daughter's wedding shower so that each family member and friend would give her a little piece of them for her scrapbook wedding album. Since I know my girl is going to go back to school this fall and is a full time teacher I knew she would not have much time to scrapbook so I kept my page simple.
Sorry for the pics, I could not get the glare out of this since I left it in the pocket page. This is the front.


Next I made her card:

Her theme is birds and branches and flowers so I thought this was fitting.
And of course you cannot forget the bachelorette party so here is her card for that. Isn't it cute?


Thanks for stopping by.
Carts used:
Tie the Knot
Lovely floral
I have a few more wedding things to share with you.
I had to make a layout for my daughter's wedding shower so that each family member and friend would give her a little piece of them for her scrapbook wedding album. Since I know my girl is going to go back to school this fall and is a full time teacher I knew she would not have much time to scrapbook so I kept my page simple.
Sorry for the pics, I could not get the glare out of this since I left it in the pocket page. This is the front.

And back view:


Next I made her card:

Her theme is birds and branches and flowers so I thought this was fitting.
And of course you cannot forget the bachelorette party so here is her card for that. Isn't it cute?


Thanks for stopping by.
Carts used:
Tie the Knot
Lovely floral
Friday, May 17, 2013
Cut it Up Challenge # 19 - Make it Mini
Hello my friends, I have another project to share for the Cut it up Blog Challenge.
Cut it up Challenge #19 - Create a mini project.
My daughter's wedding is getting closer so it was time for me to get the wedding projects completed. I made a few photo props for picture time and made the treats for the guests to go on all the tables at the reception.
Here are the photo props.


And here are the Hershey kisses with the wedding sayings on them.


Supplies:
Cricut Cartridge
~ Tie the Kmot
Just Married on pg. 56 cut at 2 1/4" sign cut at 7 x 3 1/4" then cut with mini scalloped edge scissors
~Billionaire
Mustache cut at 1 1/2"
Long Mustache cut at 3"
Glasses cut at 3"
Bow tie cut at 3"
Punch - Stampin Up!
3/4" circle punch
Extras
Hot glue and popsicle sticks
Silver and waterfall Stickles - for heart and swirl
Mini Scalloped edge scissors
Stamp ~ Jaded Blossoms
Wedding Kisses stamp set
Inks ~Stampin Up!
Basic Black - edging around Just Married stamp and stamps on Hershey Kisses candies
Card Stock
Recollections
Hop on by the Cut It Up Blog to see more inspiring projects today from the Cut it Up DT and to play along.
Thanks for stopping by.
Monday, May 13, 2013
Create A Critter 2 Series # 46, 47, 48, 49, & 50
Happy Monday my crafty friends!!!
I am happy to say that this is the last post for the Create A Critter 2 Series with Stacy. I managed to knock out all the rest of the cards this past weekend. I'm so happy that I have a good jump on all my cards this year.
I kind of have to do this since my daughter's wedding is in June and I will be pretty scarce in blog land except for my design team posts until July.
Here they are: Warning Picture Heavy
Card # 46
This card is supposed to be a Hanukkah card but I switched it up to make one more Christmas card.

Card # 47

Card # 48

Card # 49

Card # 50

Thanks for stopping by.
Hope you have a great week.
Wednesday, May 8, 2013
Create A Critter 2 Series # 45 - Ginger bread Boy
Happy Hump Day! I have another Christmas card. There's only one more Christmas card after this one to post and then on to the B-day section.
Card #45

Sorry for the picture. I'm having a little issue with keeping my hands steady. This card came with the phrase "Cookie Exchange" but I don't participate in a cookie exchange so I used my Studio g stamp, "Christmas Cheer"
Thanks for stopping by.
Card #45

Sorry for the picture. I'm having a little issue with keeping my hands steady. This card came with the phrase "Cookie Exchange" but I don't participate in a cookie exchange so I used my Studio g stamp, "Christmas Cheer"
Thanks for stopping by.
Tuesday, May 7, 2013
Create A Critter 2 Series # 44 Christmas Mouse
Happy Tuesday! Still playing catch up with Stacy. I'll be posting the rest of this cart daily so I can finish up this cart. Bear with me and I promise I'll have some grown up projects soon. :)
Card # 44
Love this little mouse.

Card # 44
Love this little mouse.

Thanks for stopping by.
Monday, May 6, 2013
Create A Critter 2 Series # 43
Hello everyone. I've been MIA for a while helping to get a house ready for the rental season in between my full time job and trying to fit a craft project in here or there. Well as you can see the crafting has suffered a bit.
I managed to sprain my wrist and was told that I also have the beginnings of carpal tunnel. Ugh. So needless to say, typing or any movement of my left hand and wrist have been rather painful lately. But enough of that... Let's move on to a happy thought.
I have another Create A Critter card since I have to finish out the cart now that Stacy is finished with the series.
One more Christmas card to add to the stack. Yay!
Card # 43
Isn't cute? I love this little dog.

Thanks for stopping by.
Hope you have a great day.
Sunday, May 5, 2013
Cut it Up Challenge #18 - Mother's Day
Happy Friday my friends. Thanks for stopping by my blog for another Cut it up Blop Challenge.
Cut it up Challenge #18 - Create a project for Mother's Day.
My Mom loves birds so to make something completely different for her other than a card, which I already have made, I decided to make a home decor project.
I saw a cute little wooden owl decoration in a craft store this week and my inspiration grew from there.

She is made of chip board and card stock and a little bit of floral wire for her feet.
Here's how I did it:
Hoot n' Holler cart
Owl cut at 10 1/4" - first on chipboard then from Black Recollections CS.
Shift layer was cut 3 times, 1-pink, 1-orange, and 1-yellow.
Layer cut 2 times, first in green then in yellow
Doodle Charms cart
Flower on pg 91 cut at 3" - pink and blue
I used a left over circle from the owl eye as the yellow dot on the blue part of the flower.
I used perfect pearls in black for the eyes and dots between the feathers on her belly.
I used perfect pearls in ice white for the dots on the beak and the yellow eye. I traced around those dots with my black zig pen.
I used the black zig pen and the white gelly roll pen on the flower.
I made the owl's feet using brown floral wire and use a left over piece for the flower stem. I hot glued these on to my owl.
For the center of the owl's eyes I use some black oval beads and hot glued them into place.
Yes she really does stand up and I know my Mom is going to love her.
from the Cut it Up DT and to play along.
Thanks for stopping by.
Friday, April 19, 2013
Cut it Up Challenge # 17 - Trees
Happy Friday my friends. Thanks for hopping by my blog for another Cut it up Blop Challenge.
Cut it up Challenge #17 - Create a project using a tree for Arbor's Day.
This was a fun project for me since I knew that I wanted to use the Camping Critter cart for this challenge. Here's my Arbor Day card.
I just love the cute little rabbits hiding behind the trees. What do you think?

Supplies:
Cricut Cartridge
~ Camping Critters
Tree with bunny on pg. 57 cut at 4" and 4 3/4" - The 4" tree was cut using the Flip feature.
~Pooh and Friends
Clumps of grass on pg. 29 cut at 1" and 1 1/2"
Cuttlebug Folders
D'Vine Swirls - trees
Swiss dots - background grass
Punch - EK Sucess
Large scallop punch - used on background grass
Extras
Foam Tape - front tree and front clump of grass
Zig pen in black for doodles on bunnies
Zig pen white for dots on bunny noses
Stamp ~ My Pink Stamper
Have a tree-mendous day
Inks ~Stampin Up!
Basic Black
Card Stock
used all my scraps, solid cs is from Recollections.
Hop on by the Cut It Up Blog to see more inspiring projects today from the Cut it Up DT and to play along.
Thanks for stopping by.
Tuesday, April 16, 2013
CAC 2 Cards # 40, 41, & 42
Hello again thanks for stopping by.
I have a few more cards for you today in the create a critter 2 series. The characters are just too darn cute not to love.
Card # 40

Card #41

Card # 42

Hope you have a great day.
I have a few more cards for you today in the create a critter 2 series. The characters are just too darn cute not to love.
Card # 40

Card #41

Card # 42

Hope you have a great day.
Subscribe to:
Posts (Atom)